Do you feel like the engagement on your old content fades away over time? As bloggers, we have numerous ways to promote our old content and help them attract the audience that matters. One of such alternatives is to recommend related content following a post or article. Have you been recommending old content to your readers too?
It's not merely about the promotion or increasing traffic to your content. It could be the ultimate goal for a blogger. But if we focus on our audience, related content can be very helpful to readers who are interested in a specific topic or looking for answers.
Sometimes the answers they have been looking for hours, days or weeks could be lies in one of the related posts / articles - making it easier to discover the relevant information.
Sometimes the answers they have been looking for hours, days or weeks could be lies in one of the related posts / articles - making it easier to discover the relevant information.
Content Discovery
In general, you have wide range of options to promote your content on Blogger platform. If we narrow it down to promoting the related posts, we have already discussed about two popular services - nRelate and LinkWithin.
LinkWithin is a solution that easy to install and unlike other services, no sign up is required either. But the post-implementation control over the widget is very limited and it doesn't provide the insights like nRelate does.
Personally, I've been using nRelate on this blog until they retire from their service. It was enriched with many advanced options I truly admired and offered statistics for the related posts too.
Now that nRelate has discontinued its service, I had to look for more alternatives. If you prefer more control over a widget, this post is exploring a new solution that you might also be interested in - Outbrain.
Outbrain Recommendations
Outbrain's Discovery Module display content recommendations and offers a few advanced settings, and insights on recommended content. You can either display recommendations as text or both thumbnail and text.
Further, it will allow you to manually remove irrelevant recommendations from the widget. And as this widget inherits the colors and styles of your blog, mostly it blends in with your template too.
Further, it will allow you to manually remove irrelevant recommendations from the widget. And as this widget inherits the colors and styles of your blog, mostly it blends in with your template too.
However Outbrain prohibit installing their widget on blogs that promote some content types,
Outbrain code may not be installed on sites that promote or are in connection with the following categories: (1) Adult, (2) Alcohol, (3) Drugs, (4) Tobacco, (5) Gambling, (6) Games / Contests / Sweepstakes / Samples / Coupons (7) Malware, and (8) Weapons & Explosives. Other prohibited content types are forum / community and e-commerce content. Aside from the above categories, most other content would be ok as long as the site consists of articles, videos, or slideshows. Outbrain reserves the right to reject any website for any reason, at our sole discretion.
The installation of the Outbrain widget doesn't take much time. But here I'll be focused on both simple and advanced installation approaches.
Simple Approach: You will only have to follow the first couple of steps to integrate the widget on your blog.
Advanced Approach: You will have to follow all the steps, but you can grab the code snippet for the widget and it allows you to place the widget where you want it to be displayed on your blog. So you don't have to settle with the default placement of the widget.
As always, eventually, it comes down to your preference. Now let's take a look how you can display recommendations on your blog with Outbrain.
Steps:
1. Register for a new Outbrain account and activate your account following the confirmation email.
2. Navigate to Get Outbrain Widget page.
3. Select the recommendation type you prefer - Text or Thumbnail. You can preview the widget as you select.
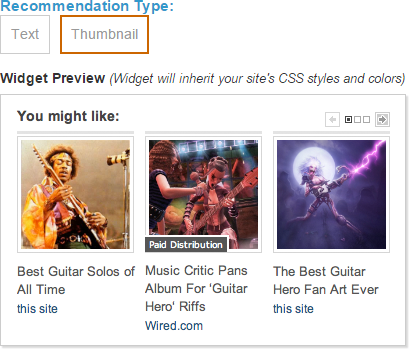
4. Choose Javascript as your platform.

Note: You can select Blogger as your platform and install the widget too. But it will render the widget right after your posts and you will have no control over the widget placement. Hence I'm gonna show you how to grab the code manually, so you can decide where should the widget should show up.
5. Now enter your blog address and select the preferred language for your widget.

Note: Make sure to enter preceding http:// as well. Else it may not take your blog address as a valid URL.


6. Tick on to agree with Outbrain terms and click Get Code button.

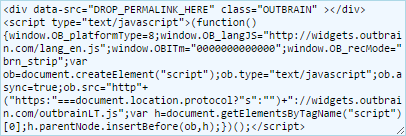
7. Now copy both the JavaScript code snippet,
and claim code,
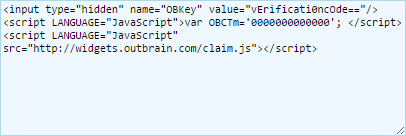
to be inserted into your template.
8. Go to Blogger Dashboard.
9. Click on your Blog Title.
10. Navigate to Template tab.

11. Search for following tag within your template
<data:post.body/>
12. Add the JavaScript code right after the <data:post.body/> line.
Notes:
* Adding below <data:post.body/> will place your button under the post. If you need to place it elsewhere on post page, read How to Position Elements on a Blogger Post Page.
* You may encounter two search results for <data:post.body/>. Add this code right after the first resulted line of code.
* Adding below <data:post.body/> will place your button under the post. If you need to place it elsewhere on post page, read How to Position Elements on a Blogger Post Page.
* You may encounter two search results for <data:post.body/>. Add this code right after the first resulted line of code.
13. Now replace following line within your JavaScript code,
<div data-src="DROP_PERMALINK_HERE" class="OUTBRAIN" ></div>
with
<div expr:data-src="data:post.url" class="OUTBRAIN" />
14. Search for below tag within the template.
</body>
15. Paste the Claim code right before the </body> line.
16. Save the template.
17. Now navigate to Manage Blogs page at Outbrain.
18. You will find your blog listed under pending blog claims. Click Check Now! link.

19. If the verification was successful, you will be notified.

20. Now refresh the page and you will find Report and Settings are listed under the Actions.

21. You're all set up to use Outbrain Recommendation widget on your blog now.
Note: It may take couple of hours to crawl and display the recommendations on the widget.
More Information:
* By default, Outbrain widget appears on post pages and homepage. If you don't wanna show related stories on homepage but on posts only, enclose your JavaScript code as follows.
<b:if cond='data:blog.pageType == "item";'>
[Outbrain Widget JavaScript Code]
</b:if>
[Outbrain Widget JavaScript Code]
</b:if>
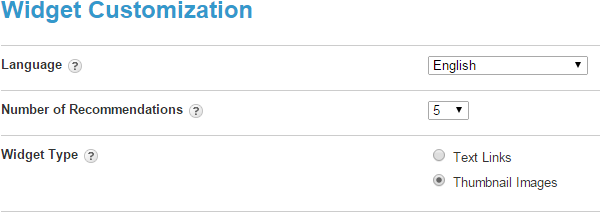
* You can customize your widget anytime from Settings - The language, number of recommendations and the widget type.
* You can review the performance and get insights on recommended content by accessing the Report.

* In case if you find Outbrain is displaying a recommendation that doesn't seem to relate to a post, you can remove it by clicking the red X icon next to the recommendation in question.

* In case if you prefer to turn off sponsored posts on your Outbrain widget, contact Outbrain via support@outbrain.com and they will help you.
* Further information on this widget is available at Blog Widget FAQ.
* Further information on this widget is available at Blog Widget FAQ.
Enjoy :-)


Fabulous tutorial Mayura. I know a lot of blogger friends would love this option. Gladly passing it along!
Hi Brenda,
Thankies for your wonderful support as always, dear :) I hope your Blogger friends might be interested in Outbrain and enjoy it as well.
Cheers...
Hi Arta,
Ha ha... You did, eh? :) I hope it will come in handy at some point dear.
Actually, Outbrain has a WordPress plugin too and it will take a couple of minutes to install and configure as you like :) As you are already familiar with WordPress, I'm sure you don't need instructions for that at all. But I'm here if you need me :)
Cheers...
Hi Mayura,
Good to see you back into action with another informative post :)
Yes, like Bren mentioned, I too also have a lot of friend's who are on the Blogger platform, and they'd love to hear about Outbrain (funny name!), so would be sharing this further. Reminds me of the time when I was on Blogger - where were you then!!!???
Thanks for sharing this wonderful tutorial with us, and keep writing! Have a nice week ahead :)
Hi Harleena,
It's pleasure to read your wonderful comments too dear :)
Ha ha... I haven't thought it's funny until you mention it now though ;) Good question. I must be missing these comments back in the day we didn't even know each others ;)
Thanks for sharing this with your friends and hope they might find how this solution could increase traffic for them as well.
You have a nice week ahead too dear :)
Cheers...
Thanks Mayura. Always know that if I hit a roadblock that you help!
Anytime dear :) Appreciate your kind words, Arta.
Hi Sherman,
It's nice to see you and I've been away as well mate :)
Really? Then I suppose you're here at the right time. It's sad nRelated was discontinued, 'cause I loved it. But as an alternative, this is a better option for Blogger too. As you're on WordPress, you have a lot more choices though :)
I'm glad you stumbled upon on this and found helpful. The widget may take some time to show up, but if it doesn't, you can reach their support for help. Hope you will find the best related posts plugin for yours.
You have a wonderful weekend mate :)
Cheers...